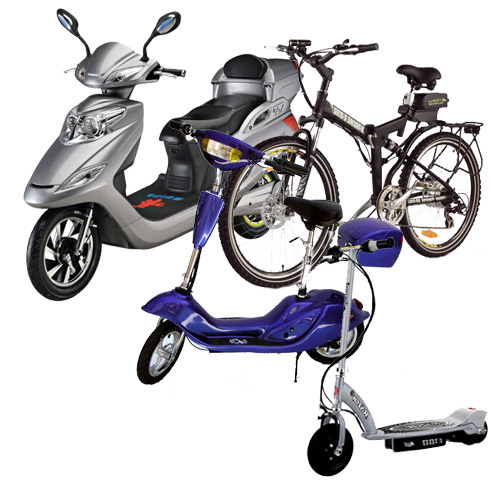
Guía práctica para el diagnóstico y reparación de scooters eléctricos, reparación de bicicletas eléctricas y patinetes eléctricos. Esta guía está destinada a técnicos con una mínima experiencia en reparación de vehiculos eléctricos personales.
¿Existe algún servicio técnico de calidad para la reparación de scooters y patinetes eléctricos?
SERVICIO TÉCNICO ESPECIALIZADO EN PATINETES ELÉCTRICOS Y SCOOTERS
Teléfonos Atención Cliente: 934087423
GUÍA PRÁCTICA
PRIMERO AVERIGUAR
Nota: reivsar instrucciones y añadir del tester de motores y controladores
Identificar Batería Voltaje (24,36,48…) Amperaje Ah Potencia max W
Identificar Motor Voltaje Potencia W
Patinete con transmisión por cadena
Motor con escobillas (2 fases)
Motor Brushless (3 fases)
Patinete con motor Bushless HUB (3 fases + sensor hall)
Si es hub identificar ángulo de fase (60º o 120º)
PRIMEROS PASOS
- Comprobar la tensión de la bateria ( Suele ser 24V o 36V) Puede llevar por ejemplo 2 de 12 para hacer 24. Si el voltaje no es el correcto el scooter no arrancará.
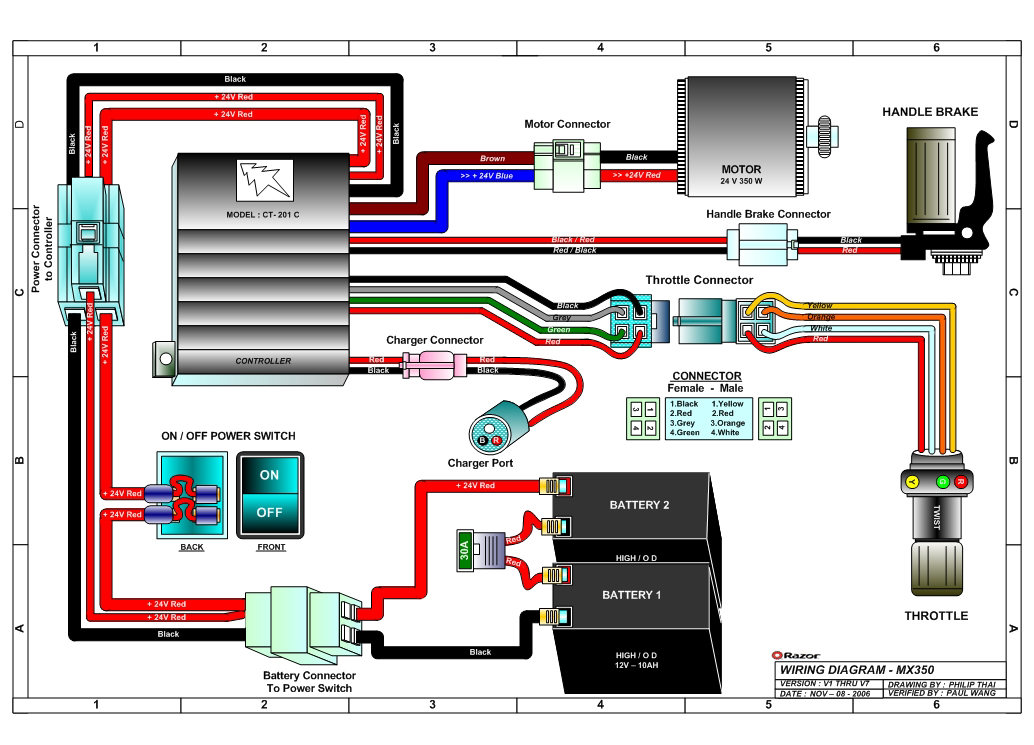
- Comprobar que llega alimentación al controlador
- Comprobar las conexiones externas del controlador al motor
- Comprobar interruptores de freno de las manetas( al apretar las manetas envian una señal de contrl de DISABLE para deterner el motor).!Ojo ! No todos lo llevan.
- Comprobar potenciometro control acelerador
- Llave o interruptor de encendido
- Conexiononado y cableado
- Kick off to go! You must be moving for the scooter motor engage. Tiene que ser fuerte. Try Pushing The Scooter To Start Electric scooters with single speed throttles will sometimes need to be pushed forward in order to run. Stand on the scooter with one foot and push it forward with your other foot while fully engaging the throttle. Once the scooter reaches walking speed and the throttle is engaged the scooter should run until the throttle is released or the brake is used.
- Inspect By Sight, Touch, And Smell
Remove the footplate or wiring cover and look for any burned or melted wires, wire connectors, or electrical components. Also look for loose, disconnected, or damaged wires or wire connectors. Pull and push on all of the individual wires and wire connectors to make sure they are not loose or disconnected. Get your nose close to the speed controller and motor and smell them. Any components that look burned or melted, or that smell like burned plastic are almost always defective and should be replaced. Motors that smell burned should be replaced to prevent damage to the speed controller.
LLEVA FUSIBLE?Check The Fuse Or Circuit Breaker
If the scooters uses a fuse, look at the inside of the fuse to see if it is burned-out. The fuse may need to be removed from the scooter and held up to a source of light to determine if it is burned-out or not. For scooters that use a circuit breaker, push-on or flip the circuit breaker to see if it will reset. Sometimes fuses burn-out in a place where you can’t see it, and sometimes circuit breakers will mechanically reset but they are worn-out and still will not work. Checking the continuity of the fuse or circuit breaker with a multimeter is the best way to determine if they are working or not.
The Scooter May Have Been Overloaded
Most electric scooters are not designed for going up long or steep hills, stop and go driving, driving with a heavy load, or driving in sand, gravel, or soft dirt.
Overloading an electric scooter can cause the fuse to burn-out, or the circuit breaker to trip. Excessive fuse burning or circuit breaker tripping caused by overloading may eventually cause damage to the speed controller or motor by overheating them.
Rubbing brake pads or shoes, due to faulty brake components or improper brake cable tension adjustment, can also cause fuses to burn-out and circuit breakers to trip.If the fuse is lost check the scooter’s owners manual or contact the manufacturer for the correct size fuse to use. Most electric scooters use fuses in the 20-40 Amp range.
CABLE DE FRENO Y BRAKE SWITH
Dos opciones, tenemos scooters que funcionan con el brake swicth en modo cerrado y otros en modo abierto.
- Si el cable del freno, no está conectado al controlador o esta cortado, el scooter no funciona.
- Modo cerrado :Podemos engañar al controlador puenteando los dos cables del conector. En cerrado el scooter funciona, en abierto no.
- Test The Brake Lever Switch
(No Tools Needed) The brake lever switch informs the speed controller to turn off when the brakes are applied. When this switch wears-out it usually locks in the on position which turns the speed controller off. An easy way to test this switch is to disconnect it from the speed controller and then try to run the scooter. If the switch is the problem the scooter will run only when the brake lever switch is disconnected.
COMPROBAR BATERIA
Comprobar si da la tensión correcta según espeicificaciones.
Realizar proceso de carga completo
Comprobar cargador de bateria
Try Charging The Battery Pack for 8 Hours
Electric scooters that have not been charged for over 3 months will have partially discharged battery packs which may not provide enough power to run a scooter at full speed. Try charging the battery pack for 8 hours and then see if that helps. It is a good practice to not leave the battery charger plugged into the scooter for more than 12 hours due to the possibility of overcharging and damaging the battery pack if the battery charger happens to malfunction.
COMPROBAR ACELERADOR (THROTTLE)
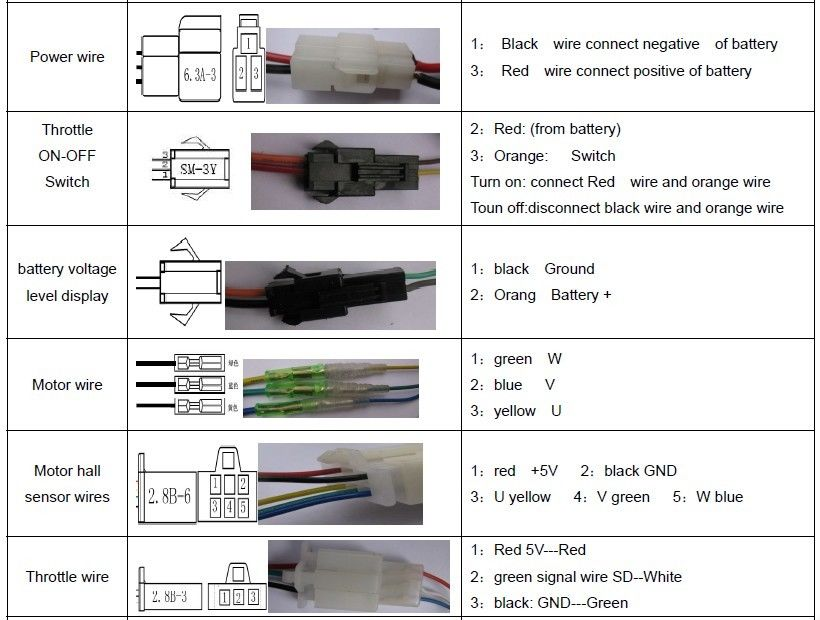
3 Cables: rojo,negro y verde o azul
If your speed display and lights do not come on when you twist the throttle then you may have a problem with the throttle. The problem can also be that the connection between the throttle and controller is faulty.
Turn off the scooter and remove the fuse. Lift the back wheels of the scooter off of the ground. Make sure that you are not in the vicinity of the back wheels. Connect 4.3 Volts DC positive to the red wire of the throttle. The black wire should be connected to the 4.3 Volts DC ground. Next take the Voltmeter and fix it to the black and the green or blue wire. Replace the fuse and turn the engine of the electric scooter on. Twist or turn the throttle to start the motor. At this point the motor should be turning. If this does not happen then there is a problem with the battery, ignition key or the connection to the controller. If the motor does turn then there is a problem with the throttle. The voltmeter should ideally read between 0 to 3+ Volts. If the number is low then there is an issue with the throttle. Remove the wires from its attachments and switch off the engine.
Comprobar el acelerador con el tester de motores (test the steer)
COMPROBAR CARGADOR DE BATERIA
Plug the battery charger into the wall and look for one or more illuminated indicator lights. If an indicator light is not illuminated or blinks on and off when the charger is plugged into the wall then the battery charger is defective.
(Tool Needed: Multimeter) If you have a multimeter you can test the battery chargers output Voltage. Its Voltage should be a few Volts above the battery chargers rated Voltage (24V, 36V, 48V, etc.). If the battery chargers output Voltage is zero, or if it is below the battery chargers rated Voltage then the battery charger is defective.
Test The Battery Charger Port
(No Tools Needed) If the battery charger is plugged into the wall, unplug it. Plug the battery charger into the battery charger port on the scooter and look for an illuminated indicator light on the battery charger. If an indicator light on the battery charger illuminates when the charger is plugged into the scooter then the wiring and wiring connectors going to the charger port are good and the charger port itself is good.
(Tool Needed: Multimeter) If you have a multimeter the battery charger ports Voltage can be tested. The Voltage level present at the charging port should be the same as at the battery pack.
COMPROBAR LLAVE O BOTÓN DE ENCENDIDO
Test The Key Switch Or Power Switch
(No Tools Needed) Test the key switch or power switch for proper mechanical operation by moving it from the off position to the on position several times. The switch should snap into both positions. If the switch feels loose, or if it does not have a positive snap-action feel to it when switched between the on and off position then it may be defective.
(Tool Needed: Multimeter) Sometimes the key switch or power switch will feel good and have a positive snap-action feel to it when switched between the on and off positions but it will still be defective. Testing the continuity of the key switch or power switch with a multimeter is the best way to determine if it is working or not.
COMPROBAR MOTOR
Si es con escobillas:
Alimentarlo a ver si funcionan
Si es brushless:
Comprobar bobinado con tester motores brushless
Comprobar fase con tester motores
Si es hub: Comprobar secuencia sensores hall:
Para 60º → 100 – 110 – 111 – 011 – 001 – 000
Para 120º → 100 – 110 – 010 – 011 – 001 -101
1→abc 2→ acb 3→ bac 4→ bca 5→ cab 6→ cba
Inspect The Motor
Look for any burned or melted wires or wire connectors attached to the motor. Burned or melted wires or wire connectors indicate overheating of the motor which may cause the plastic insulation to melt off the motors electromagnetic copper wire windings.
If the insulation melts off the copper windings they will short circuit and cause the motor to not run or to run slowly. Short circuited motor windings can also burn-out the speed controller by giving it too much resistance which makes it work too hard and overheat.
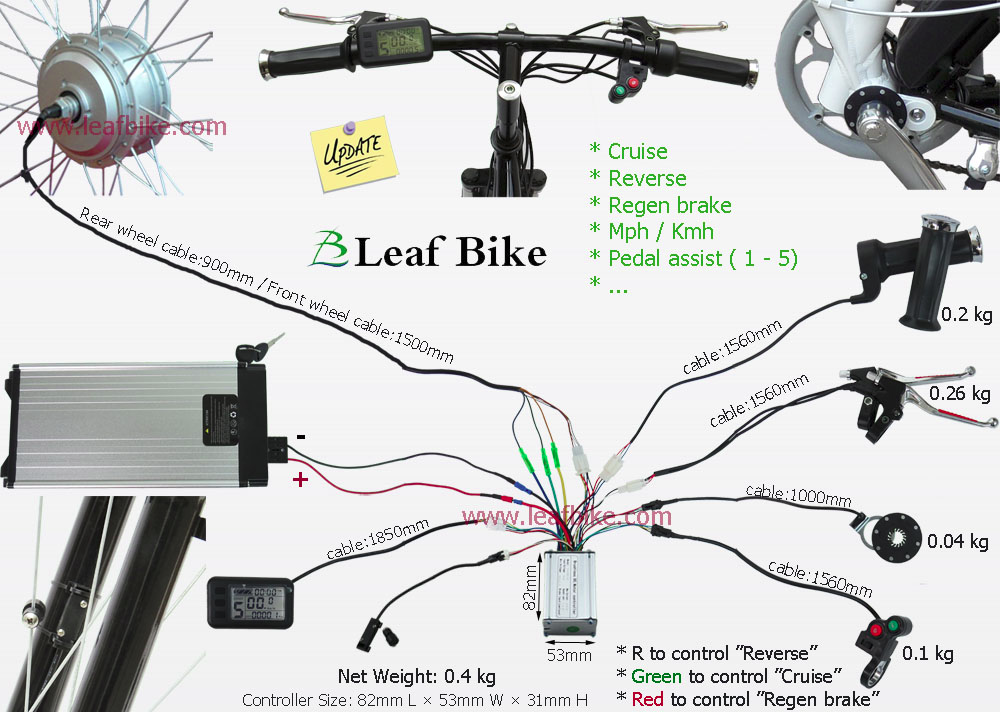
Nota: Se puede conectar un motor hub a un controlador wireless sin hall signal, sólo conectando los 3 cables de fase del motor al controlador.
Más sobre motores hub:
Reparar motor hub: https://www.monocicloselectricos.org/sin-categoria/reparacion-mejora-motor-hub.html
Comprobar sensores hall: https://www.monocicloselectricos.org/revista-monociclos-electricos/principiantes/articulos-tecnicos-y-manuales/comprobar-sensores-hall-los-motores-hub.html
Clasificación de motores eléctricos: https://www.monocicloselectricos.org/sin-categoria/imanes-electroicamnes-permanentes.html
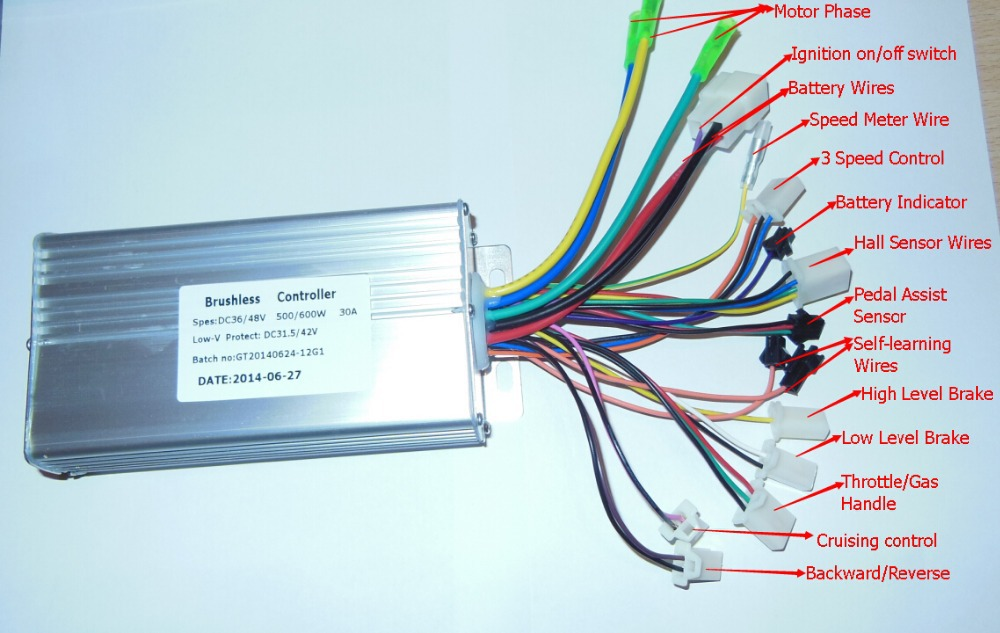
COMPROBAR CONTROLADOR
Identificar contrtolador: voltaje, Ah,W y si va con sensores hall.
Le llega alimentacion?
Testear controlador con tester de motores (Test controller): Comprueba si le llega alimentación y al darle al acelerador tenemos que ver la secuencia correcta en el tester.
Revisión visual de la placa del controlador ( ver posibles componentes desoldados o quemados)
Reglas básicas:
1) motor del cepillo debe coincide con controlador cepillo;
2) motor sin escobillas/hub motor debe coincide con controlador sin escobillas;
3) controlador y el motor voltaje debe igualmente el mismo
4) motor de potencia puede ser el mismo y más pequeño que tha controlador potencia po wer, no grande nunca. Ejemplo: usted puede utilizar un 250 W controlador funciona con un 250 W motor o menos que eso, nunca más de 250 W.
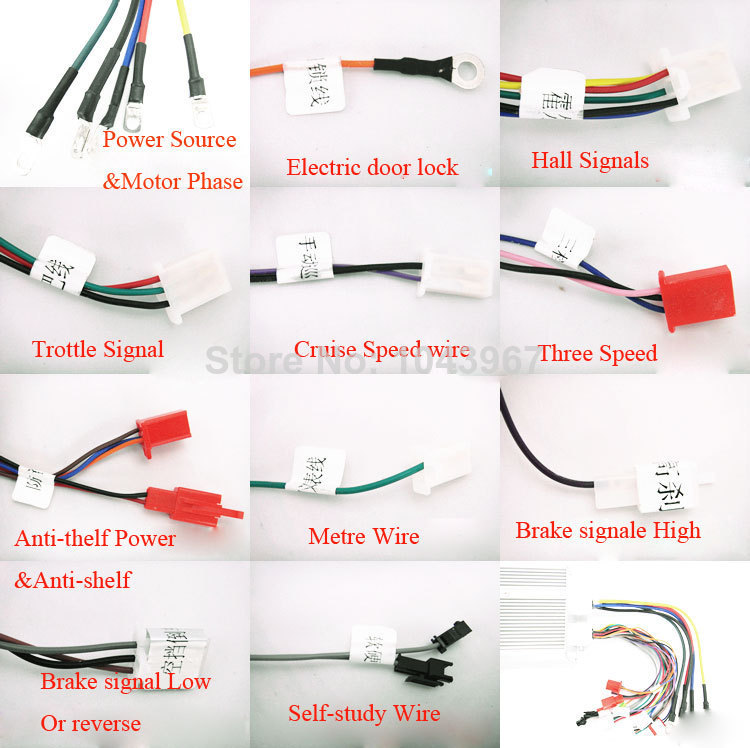
3) todos los controladores tienen cables básicos conectores incluyendo: motor, batería, acelerador, freno, potencia Lockes (encender/apagar el motor), carga puerto.
Sólo tienes que encontrar mismos colores de cables y enlace juntos.
4) algunas controlador tiene conectores adicionales tales como, atrás, indicador de energía, luz de freno o etc .. ¿ Qué se puede hacer sobre los cables??
Si usted no es necesario utilizar ellos o simplemente no tiene una luz de freno, acaba de salir de allí en el controllter, No afectará el uso del controlador.
Inspect The Speed Controller
Look for any burned or melted wires or wire connectors on the speed controller. If any wires are burned or melted then the speed controller may be defective.
Smell the speed controller for any burned plastic smells. If the speed controller smells burned then it is almost always defective.
If the speed controller has no burned or melted wires and it does not smell like burned plastic then it still could be defective. Test all of the other components of the electrical system around the speed controller and use the process of elimination to detect if the speed controller is working or not.
Speed controllers are too complex to easily test. Using inspection and the process of elimination is the best way to determine if a speed controller is working or not. If all of the other components of the electrical system test good but the scooter does not operate that indicates a defective speed controller.
Tambien identificar si mide velocidad,frenos,pedaleo
Comprobar si el controlador está alimentado
Revisar el puente H compuesto por 3 transistores MOSFET tipo P y 3 transistores MOSFET tipo N . Transistores tipicos del puente de Mosfet de potencia pueden ser el 2SJ401 para el lado P y el BUZ10 para el lado N.
Existen circuitos de prueba de los mosfet( mirar este circuito) , pero una idea aproximada es comprobar la continuidad entre A , y K en un sentido y el aislamiento de A y K con la puerta G.
Probados los transitores, comprobaremos que al circuito integrado principal ( suele ser un MC33035) le lllegan las tensiones correctas ( el datasheet de este cicrcuito integrado esta disponible muy facilmente en Google).
SI TODO HA IDO OK , FORZARMOS EL ARRANQUE DEL CONTROLADOR COLOCANDO EL CIRCUITO DE LEDS DE LOS SENSORES HALL (EXPLICADO ANTERIOREMENTE ) Y SEPARAREMOS LA ALIMENTACION DE ESTE DEL CONTROLADOR , ES DECIR, SEPAREMOS LA ALIMENTACION DE LOS SENSORES HALL DEL RESTO DE LA PLACA: EL MOTOR DEBERIA GIRAR
- SI GIRA ES SEÑAL QUE FALLA EL CIRCUITO DE ACTIVACION DEL MOTOR ( QUE DEPENDE DEL SENSOR DE PEDALEO , DE LA VELOCIDAD DE GIRO Y DE LAS MANETAS)
- SI NO GIRA : PROBABLEMENTE EL CI DEL CONTROLADOR ESTA AVERIADO
VIDEO AYUDA DIAGNOSTICAR PATINETES
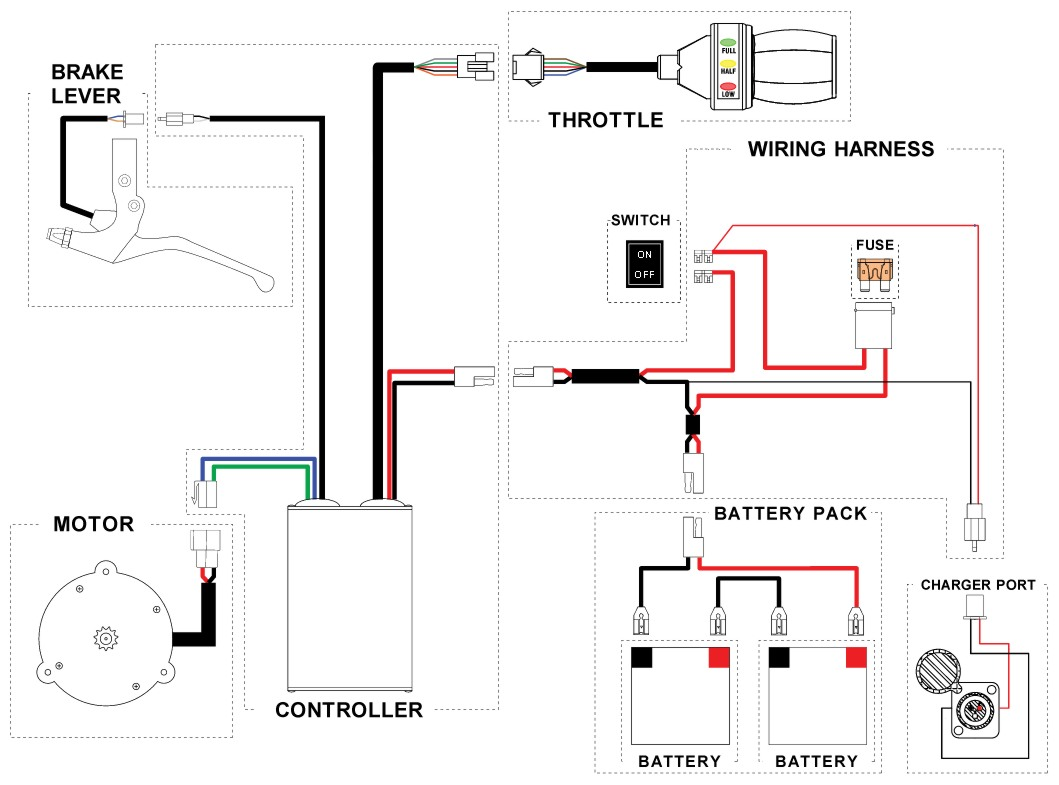
DIAGRAMAS CONEXIONES Y CABLEADO
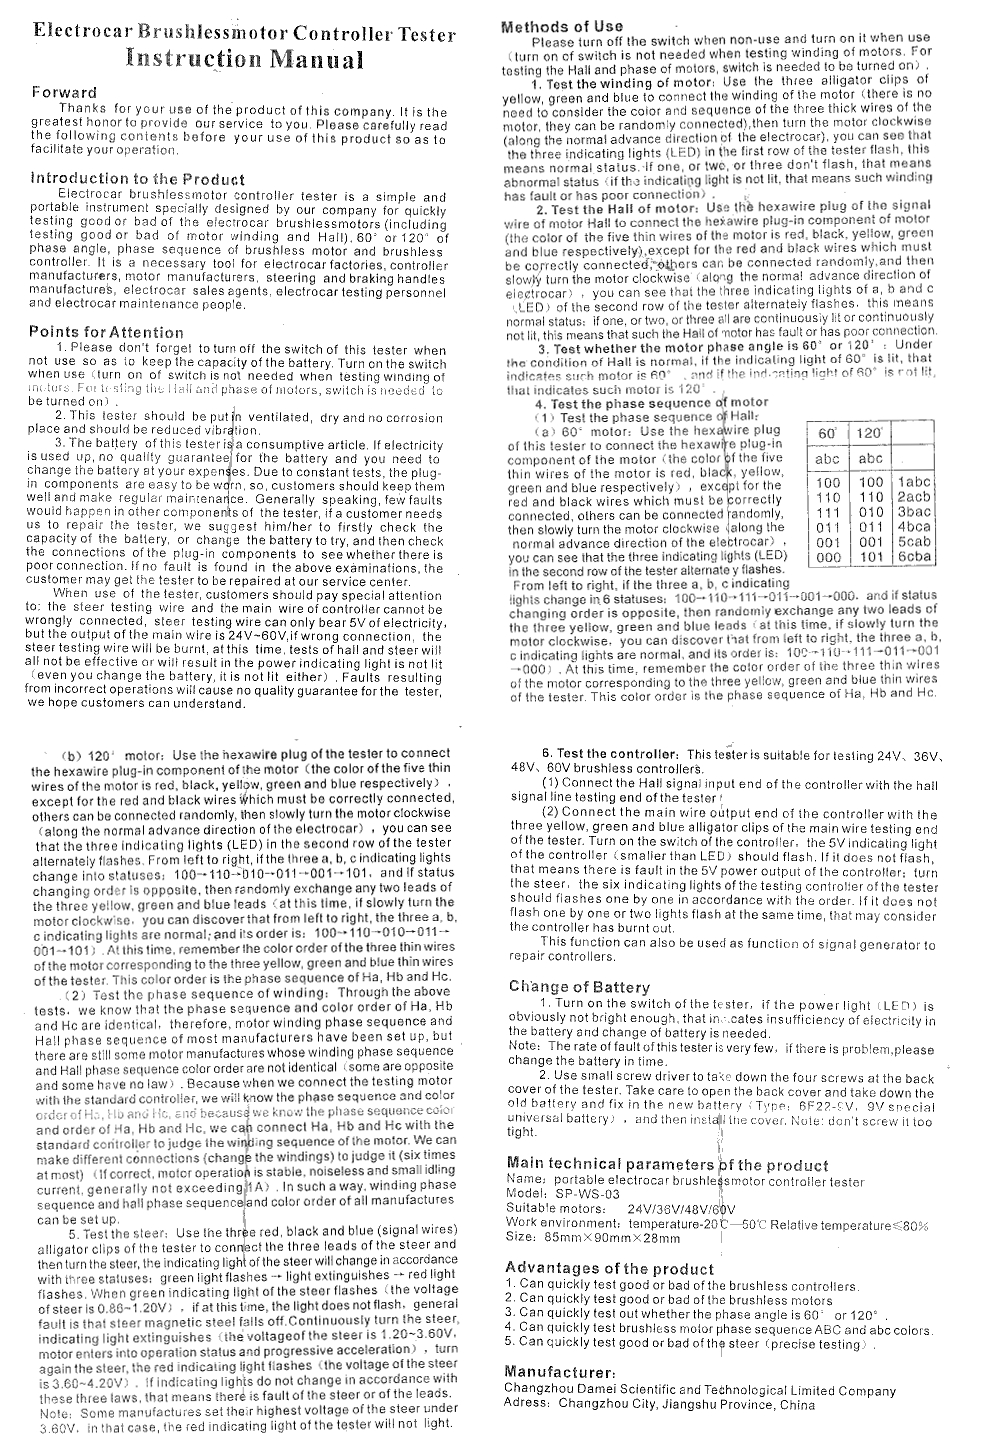
MANUAL DE INSTRUCCIONES DEL TESTER PARA MOTORES Y CONTROLADORES DE MOTORES ELÉCTRICOS BRUSHLESS
Electrocar BrushlessMotor Controller Tester